Windows
New Version Of Litecoin Miner Status Released
1Hi,
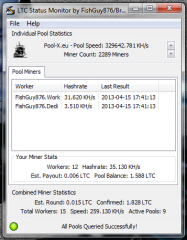
Today I released a new version of my popular Litecoin Miner Status program. The tool sits in the background of your computer and monitors various litecoin mining pools for your mining activity. The program does not do any mining of it’s own, it simply watches the pools that you mine at to provide you with statistics about how well your miners, and your profits are doing. You can go directly to the application page Here or by the Discography -> Litecoin Miner Status link at the top of this page.
Lots of changes & tweaks have gone into the new program, including the addition of new pools to monitor. If you mine LTC and wish to keep track of your mining rigs or your coins, give the program a try.
rfcpool Bitcoin Miner Status Tool Released
0This last couple of weeks I have been working on my Bitcoin Miner status API for rfcpool, and finally got around to releasing the first versions of my status tool, I’m glad I’m getting the hang of bitcoin now, thanks to SoFi. The API itself can do more than monitor the status of one mining pool, and in the future it will connect to multiple pools and display the results together in the same window. Originally, it was started when I began working on an alternative to the GUIMiner application, which I hope to finish one day.

If you are into BitCoin mining, why not check out rfcpool with their no-fee PPLNS payout system and give the app a whirl 🙂
I have set up a dedicated project page for the app, you can find more detailed information about it HERE.
Toshiba L675D And Kubuntu 10.10 Maverick/Lucid No-Boot – SOLVED!
0I picked up a new laptop last week (L675D-S7015) to replace my failing HP laptop, and one of the first things that I wanted to be able to do on it was install Linux. On the old machine, when it was set to dual boot the Windows part would randomly reboot during startup, which was terribly annoying. So, on this machine I was very frustrated when I went to boot my 10.10 Kubuntu Live CD, and was just presented with a blinking cursor seconds after pushing the Start Kubuntu option from the disk menu!!
After a bit of playing and thinking about the problem, I remembered an issue I had a long time ago on a different Toshiba with ACPI. I did some googling and all I could find on the subject was people trying the ‘nomodeset’ and ‘forcevesa’ modes, which didn’t work in this particular case. I was able to remedy the issue by pushing F6 on the CD menu and select ‘acpi=off’ and then booting. Fired right up!
Once Kubuntu is installed, and you reboot for the first time, you will again experience the same problem. To fix this, we need to make a slight tweak to the Grub boot options. When the Grub menu appears showing your choice of OS, highlight the Linux kernel and push ‘e’ to edit it. If your linux doesn’t show the grub menu, you can hold shift during the beginning of the boot to show it. Scroll down to the part that says ‘quiet splash’ and add ‘acpi=off’ to the end of the string. Push Ctrl+X to boot it. You should find now that you can boot to the linux desktop.
Now we can get it to work, we need to make these changes permanent. Once booted, go to a terminal window and type ‘sudo vi /etc/default/grub’ and just like before, find the GRUB_CMDLINE_LINUX_DEFAULT and add acpi=off to the end, it should then read ‘quiet splash acpi=off’. Save the changes, exit the editor and you MUST run update-grub in order to make them permanent. It re-generates the grub configuration file, and makes the changes permanent.
After this is done, you can reboot to test it, but it should work without you needing to do anything else! You can proceed to install updates and new kernels, and the option will automatically be applied when the kernel is upgraded!
If like me you boot to more than one OS, while you are editing the grub config file you can change which OS is booted by default. Looking at GRUB_DEFAULT which is 0 by default, and will boot the topmost option. Set it to 3, it will boot the 3rd OS in the list. Set it to whichever OS you want to boot if it isnt the default, and dont forget to update-grub! You can also change the GRUB_TIMEOUT value from 10 seconds to anything you please.
I took some crude pictures using my phone of the process. Hope this helps someone else who has been frustrated with this process!
Dual-Booting Kubuntu Alongside Windows 7 Without Wubi – Properly!
0 The hard drive took a major dump in my laptop this weekend, left it backing up some stuff while I went to go see Tron, and when I got home it sounded like a DJ was scratching some kind of new rap tune. Needless to say, the drive was on its way out, but luckily I have been able to recover almost all of my data so far 🙂
After installing a replacement hard drive, I thought it was about time that I put a dedicated linux partition on this system as I have been using Kubuntu to do some Android development (installed via Wubi). While Wubi is nice for messing around, it isn’t the most stable system to be using and I have had a couple of disasters in the past with it messing up my virtual partitions. Wubi also has some known bugs, where after installing inside Windows, you’ll get a message about no root filesystem being defined and that you should fix it in the partition manager. Nice, if you can actually get there to do it!
So, I installed Windows 7, left 40gb of free space intentionally for Kubuntu. After the process of doing all the software installs and updates etc. for Windows I thought that I had better take a shot at installing the Linux side of things. Boy, what a mess 🙂 Firstly, there is something about the partition layout in Windows 7 that GPartEd just cannot see them (even using the GPartEd Live CD, or any LiveCD including Kubuntu). It thinks my hard drive is completely unpartitioned. Not what I was expecting, as I was hoping I could just throw some linux partitions into the free space, and then install. Very confusing 🙂 Adding any changes at this point would erase my new Windows 7 partition instantly.
I remember something a friend told me years ago about partitioning, that he had once used Linux to do the partitioning of his drives for some wierd XP install, as the Windows tools at the time were quite shit, so I figured that to get this to work the way I want it, I should probbably attempt something similar. I didnt really have much to lose (besides sitting through a few hundred megs of Windows Updates) so I went ahead and prepared the partition in GPartEd.
An important thing to remember here is the partition table. You must go into the Partition Table section and create a new ms-dos partition table, otherwise if you don’t it may try and use GPT by default (which won’t work with Windows 7). If you try to install Windows 7 without this partition type change, it will pop up a Warning message when you try to select the partition, and clicking Details will tell you that it cannot install on a GPT partition. So, after this step (which will completely zap your entire drive) I proceeded to create an NTFS partition, leaving 40gb free space for Linux later on. After applying the partition changes, booting the Windows 7 installer and installing windows by selecting the NTFS partition I just created, I was then able to reboot with a KUbuntu LiveCD and work with the free space on the drive correctly! It will even mount the Windows partition (just remember to hit Yes on the option to Unmount it duringi the Kubuntu install). Even grub works well and offers Windows 7 as an option in the boot menu.
When installing Linux with manual partitions, remember to add a swap partition at least 2x the size of the available ram in the machine, and the rest can then be an ext4 partition (that mounts to /) and thats the minimal that Kubuntu will need in order to boot correctly. Grub takes care of the rest of the issues with booting and selection etc. as most of Grub resides in the liunux part.
I am sure that several people have had problems trying to get the dual booting to work correctly, so I hope that this helps at least one human being out there who has struggled with this as long as I have.
Immutable Drives In VirtualBox On Windows
2I have been playing with VirtualBox for the last day or so now, and I am very pleased with the way that it works so far. Feels snappier to me than VMWare did, but maybe thats just me 🙂
One of the more useful features I found in VirtualBox is immutable hard drives. These are drive images that never change, so to speak. Any data that is written is saved to another drive containing only changes, so if you have lots of VM images for many different projects (like I do) you don’t have to install an OS on each of them; Just make a differencing disk and only make it the size of the changed data (such as programs and updates etc.) Brilliant!
It took me a while to figure out how to make an immutable disk on Windows, as the GUI is not very friendly towards this process. You should start by making a new Virtual Machine with the desired OS (I used Windows for the time being) and create a new hard drive image for it. From that VM, proceed to install Windows as you normally would do, activate it and install all your Windows updates and tools you wish shared to your multiple machines. For me, this is mostly just Windows, all the updates, and Altap Salamander.
Once this process was done, I proceeded to delete all temporary files from the system, a bunch of un-necessary Windows files, and ran a defrag on the drive using PerfectDisk to make sure everything was at it’s peak performance.
In order to make the drive immutable, we have to perform several steps to it. Firstly, I compressed the VDI image to make sure the file was as small as possible. While cloning will do this for us as well (described later) I wanted to keep the original image small in case I needed it for something else in the future. VirtualBox is great in that you can control it via the command line. Open a Command Prompt and change the folder that you installed VirtualBox and run the VBoxManage command with the modifyhd command, followed by the VDI file and the compact command:
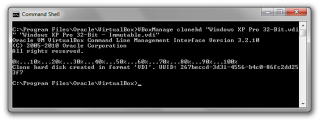
This may take a few minutes to complete, but if the file has lots of empty space in it, that will all disappear after the process is complete. Next, we will make a clone of the disk. Again, I chose to do it this way so I could keep the original for something else in the future. Cloning a drive is very simple to do, using the clonehd command and the filename of the source VDI, and a filename of a target VDI. Cloning is an important step, as VirtualBox won’t allow you to use the same VDI file copied to multiple locations, the cloning process changes the internal drive GUID so that the clone can be added as a seperate drive. In VMWare in the past, i’d have huge VMDK files that I would just copy to a new VM and launch from there, which also resulted in much larger files being used than what was actually necessary. I cloned the drive using the following command:
VBoxManage clonehd "Windows XP Pro 32-Bit.vdi" "Windows XP Pro 32-Bit - Immutable.vdi"
Which will produce a new VDI file that we will use with our future VM’s:
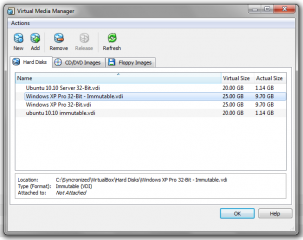
If you go back to the Media Manager in VirtualBox, click on Add and add the newly created VDI file to the list of volumes. Everything should match except for the name. The next step is to mark this as an immutable drive, so VirtualBox recognizes it as such. This is done with the modifyhd tag as follows:
VBoxManage modifyhd "Windows XP Pro 32-Bit - Immutable.vdi" --type immutable
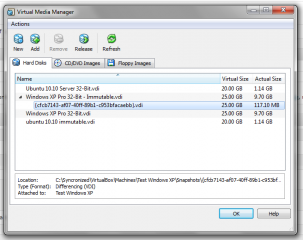
And if you refresh your Media Manager folder, you will see that the drive type is now set to immutable:
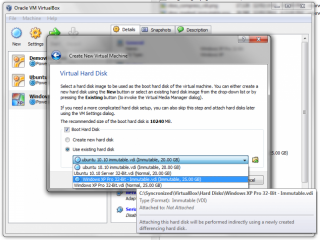
So, now that we have an immutable drive we should probably try and use it 🙂 To do this, simply go back to the VM management and create a new Virtual Machine for Windows as you did before. Now when you get to the part where it asks about the Hard Drive, choose an existing drive and select the Immutable image, You will notice that it has a blue spot next to it, signifying that it’s immutable:
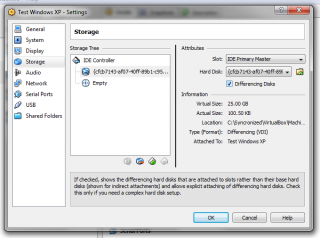
After the VM is created, click Settings and go to Storage, select the Immutable drive and place a checkmark in the box for differencing. This will cause a new hard disk name to appear. Click OK to accept the changes, then launch the VM. It will boot to the same way as it did before, except its not using the old image. Make sure it boots OK then go ahead and shut down the VM so we can make some changes.
Some Notes About Differencing
Typically, drives that use differencing disks will “forget” the changes made to them once the VM is restarted. This is the case here by default, once you boot with a differencing disk, any changes made will be lost when it shuts down. This protects the original disk, and prevents anything from changing in it. Its always easy to see which VM’s use immutable drives, if you go to the Media Manager there will be an expandable arrow next to the main drive, which contains all the differencing disks from the various VM’s that use that specific immutable drive.
Differencing disks can be changed to allow them to retain their changes after the VM shuts down. In the console, simply run the following command (exchanging the GUID for the one found in your media manager) :
VBoxManage modifyhd cfcb7143-af07-40ff-89b1-c953bfacaebb --autoreset off
The filename should match the GUID and is located in the Virtual Machines folder/{Machine Name}/Snapshots folder. Mine is {cfcb7143-af07-40ff-89b1-c953bfacaebb}.vdi respectively.
After that, any changes written to the disk will remain permanent! I hope this helps someone out there with a similar situation, and that this helps then understand it a little better 🙂
Recent Experiences With VirtualBox – Better Than VMWare :)
0I would like to thank my friend bpoint for getting me into using VirtualBox instead of VMWare, I am already finding it far more useful and saved considerable amounts of disk space 🙂
VirtualBox is a virtual machine system that allows you to install additional OS’es into virtual machines, including Windows, Linux, and even Mac!
Im sure I will blog about it more when I learn how to use it properly and all that good stuff 🙂
Win32 – SDL Loses Sound When The Main Window Loses Focus – Fix
0So, I ran into an interesting problem this week while working on the “Alien Invasion” music disk that causes all sound to be disabled when the main SDL window would lose focus or become hidden. This could be a bit of a problem for a music disk, so I looked into trying to figure it out for myself.At first I tried the usual SDL culprits, which are the event system for handling focus, but no luck there.
After some poking around in the SDL source code, I was finally able to find a fix. In SDL_dx5audio.c you can change the following function to read:
void DX5_SoundFocus(HWND hwnd)
{
    // This makes sound audible regardless of focus being lost
    //mainwin = hwnd;
}
A better solution long-term in SDL will be to have an option to do this, rather than having to change the code, or just have this enabled by default. We’ll see! This was tested on 1.2.14 which is available to download from http://www.libsdl.org Hopefully someone else can find this useful too 🙂


Recent Comments