Andy Kellett's Blog
The Inner Workings Of A Coders Brain
After a long time of not being active on the App Stores, our game Reversi Magic has finally been updated and launched on all three mobile app stores – Google Play, Apple App Store and Amazon App Store. Links to get the latest versions of the game can be found here – https://www.fishguygames.com/reversi/
This major update has been a long time in the works, with lots of changes to the game & engine to make it fully compatible with the most up-to-date Android and Apple devices. The following is a small list of the more important features that have been added or changed in the game:
The following is a list of some features that are planned for future updates:
We hope that you enjoy playing the game as much as we have spent working on it. Please feel free to reach out to us with any comments, concerns or other feedback, and please consider leaving a review on the app store of your choice. We look forward to hearing from you!
![[Twinz! ScreenShot]](https://i0.wp.com/www.andykellett.com/wp-content/uploads/2023/06/348931293_568444368769535_3786055641685934431_n.jpeg?ssl=1)
After a long time of no updates, I have finally released an updated version of my Twinz! game! The last updates came a really long time ago, and due to family, careers and other life events I ended up not being able to spend as much time programming as I would have liked, so all of my games have taken a spot on the back burner.
After a few weeks of work, my game engine has been updated and we are slowly making progress in updating all of games to run on the newer modern devices. This last week, the game has been released for Android on the Google Play & Amazon Marketplace App Stores. There is also a version of the APK that can be downloaded manually from the Twinz! Website.
As part of this update, we have made many quality-of-life improvements to the game that have been requested over the years, along with 3 additional levels to make the game even more challenging. Try to beat all 10 levels on every difficulty, and submit your best high scores to see if you can become the best Twinz! player in the world!
The iPhone/iPad version of the game is almost ready and will be released in the next week or so. Each App Store has a Free version of the game that is supported by Adverts. There is also a Pro version, which contains no adverts and has no additional delays etc. at the end of each level.
Links:
Twinz! Website
Twinz! on Google Play
Twinz! on the Amazon App Store
We hope you enjoy playing our game!
I recently came into possession of a new (used) Schleuniger 9500 PowerStrip machine that my company purchased for a good price online. It needs a bit of love and attention, but will be a challenging project to return to it’s glory. See the pictures below – I have added comments to them where necessary.
As you can see, it’s very dirty. One of the biggest problems I see so far is that someone has started to take this thing apart, and just quickly threw a couple of bolts together to barely hold it together. Even the computer in the display got the dismantle treatment and the screws and nuts were just thrown in a bag, along with some nice big fingerprints on the LCD :/ Lots of damage to the transports, the fans are broken, someone has cut wires in the power supply to do something of their own with the fans (and I think they tried to bypass the safety interlock at the same time theyy were looking for lines to power said fans) and lots of other hidden gems.
Other things to notice are the damage to all of the transport pulleys, the aluminium is really messed up too. The Power supply is not screwed in (its kinda flopping around in there), fans are broken, the front of the machine is cracked and the shelf on the bottom of the machine is completely bent up. The Right transport has a bearing issue, not surprising as it’s been beaten to death with a hammer (see the pictures if you don’t believe me!). I’ll have to completely remove that unit as I can’t tell if its salvageable, the might have lost too many pieces already. One thing is for sure, it doesn’t work or look right!
This should be a fun project to start working on! I will try to post updates as I progress on this. Feel free to leave any questions or comments! Enjoy!
When I moved into the new house I bought a snowblower from the neighbours the exact same day for a hundred bucks. It needed some work, which I was able to complete, but until this weekend we never really had any snow to use it with. Finally, I was able to use it after two years of waiting and I can honestly say that I am very impressed with it!
Amongst many things, the snowblower needed some work on the engine. A lot of work on the engine. Im pretty sure the oil that was in it was from the factory, and had been there for quite a few years. When it was drained for the very first time it looked like black treacle. It wasn’t until the 2nd time I drained it that I could really see that it was full of metal fragments. In fact, I spent a couple of days working on this specific problem and probbably changed the oil a dozen times in all.
This weekend was quite brutal, we got a total of around 18 inches of snow over 3 days and it was nice to get to use the machine. I tried to capture some earlier videos and they didnt turn out so good. Not only did I take care of my property line, but also 3 of the neighbours. Im not a pro at using this thing yet, but it definately showed me that it was more than capable of moving significant depths of snow very quickly.
It’s been a while since I wrote anything about this project, but I have been working hard on my Parker Controller library over the last few weeks. There were several goals I had in mind for this project before I even laid down any code, and I think I was able to get most of them knocked out.
The biggest goal I think, was to make a library that was easy to import into any existing project that required a Serial connection, and just Go. Add a few commands to set up the connection, and away you could go! Another large goal was to control how the library was used. I didn’t want to create something that was limited specifically to a Parker controller; And in addition to that, I may or may not want to use certain modules. So, a lot of work went into the theory of the library and I think its working out pretty good so far.
The last time I used a libraryy similar to this was in my old CNC bender projects such as FlexIO, so compared to those original versions, here is a list of key feature changes I made to improve the library for new projects in the future:
The following is an example of some code for a typical Serial object:
// The object is created in code anywhere you like, or in your app class
// Header as a global object. Its entirely up to you. You can also define
// Multiple objects individually or in an array.
DexSerialPort  ComPort;

// Clear out any previous settings that might get in the way
MyProject::ComPort.Clear();

// Set up the Connection. We can specify a unique Logfile ID to use for
// Each connection, along with a unique name for the connection. If
// Multiple connections use the same log, this name will help identify
// Where messages come from.
MyProject::ComPort.SetDexLoggerID(LOG_FILE_SERIALPORT);
MyProject::ComPort.SetConnectionName("Parker 6K6");

// Set standard connection parameters for COM3
MyProject::ComPort.SetCOMPortNumber(3);
MyProject::ComPort.SetBaudRate(9600);

// Are we using the built-in command parser and processor?
#if defined(DEX_USE_SERIAL_INTERPRETER)
// We can specify how many commands are stored from the controller
// At any one time.
MyProject::ComPort.SetCommandBufferSize(150);
#else
// The project will assume you are using your own interpreter for
// Serial Port responses and let you handle it in our own way.
#endif

// Attempt to make a connection to the device
bool ConnectResult = StrutterObject::ComPort.OpenCOMPort();

// Did we connect OK?
if (ConnectResult == true) {
	// The connection was successful!! Show the About page for the
	// Controller (about 40 lines of info)
	Strutter.ComPort.SendSerialCommand("HELP:");
}

// We can also check at any time to make sure the controller is
// Online via code checks.
if (MyProject::ComPort.IsControllerOnline() == true) {
	// Here you can do something that our project requires!
	// Let's see if any data exists on the port for reading!

#if defined(DEX_USE_SERIAL_INTERPRETER)
	// Query the port, do a Send/Receive of anything in the buffers
	MyProject::ComPort.ProcessDataExchange();

	// Do we have any commands currently stored in the command buffer?
	uWord CommandsReceived = MyProject::ComPort.GetReceivedCommandCount();

	// Do we have anything stored?
	if (CommandsReceived > 0) {
		// At least one command is available in the command buffer
		for (uWord ShowCommands = 0; ShowCommands < CommandsReceived; ShowCommands++) {
			// Get a char version of the received command. There are many
			// Other ways to recover and interact with the commands.
			// With a received command, your code can process the response
			// Accordingly, but we will just dump them to the log here.
			dbgmsg("Command Received: '%s'",
				MyProject::ComPort.GetReceivedCommandAsString(ShowCommands);
		}
	}

	// After all commands have been processed, empty the buffer completely
	// Before querying for the next set of received commands.
	MyProject::ComPort.ClearReceivedCommandBuffers();
#endif
}

// Finished using the port?
MyProject::ComPort.CloseCOMPort();
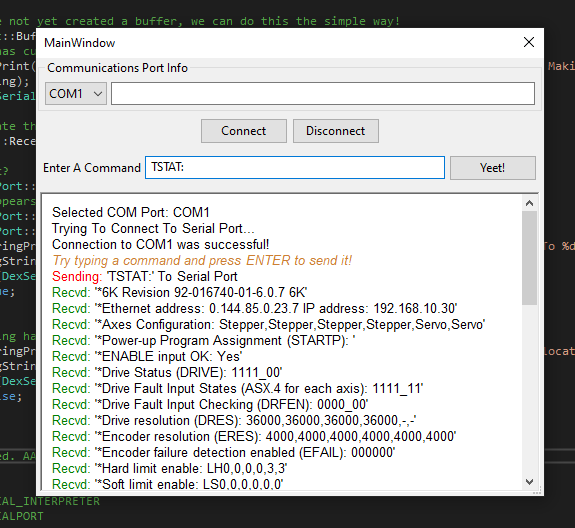
Example screenshot of a sample communication tool for any Serial connection (we used a 6K6 in this example):

Whats Next For This Library?
Im not sure! I want to keep working with this as it has been bugging my mind for a really long time. There were so many unfinished things on prior projects that I wanted to close this chapter. Then, I might work on a routing table or something similar. Until the next time! Feel free to leave any comments or questions below!
Its been a long time since I did any work on the Parker Controllers, but I have been having the itch again for quite a while to do some more work on it. There were many things I was doing with the controller that could have been optimized, or improved – such as better feature detection and improved latency. I also never really got around to adding encoder support for any of my previous projects with the controller.
I recently got a Parker 6K6 controller from eBay to work with. They are available for less than 50 dollars nowadays. Its been a lot of fun writing new code to talk back and forth with the controller in a proper, organized way. I have made a new basic communication library that allows easy connection and Send/Receive capability and can be shared across various C++ projects, so if I want to make something new I can just import that code and get going. Adding an interface with wxWidgets 3.xx is fairly straight forward and saves a lot of time. A long time ago I had used an old Parker controller (It wasn’t a 6K4, it was a much older model that used an ISA connection card) to make an experimental CNC routing table for a saw. It was pretty basic, it just about worked but wasn’t very good.
My son is also going to tech school and has been expressing an interest in learning how to work with CNC machines a little more in-depth than just loading a model and pressing the Start button, so I think if I can teach him some of this from a purely technical level, it will help him understand better. I think that him helping to build the machine and understand the programming will be quite beneficial. G-Code in itself is quite a complex thing to learn, especially from an optimization stand point, so we will have to see how it goes.
As I make progress in code, I will make some updates here. If you are interested in this sort of thing or have any questions, let me know in the comments below. Not sure anyone even uses this controller anymore!
I recently purchased a new (old) car from a good friend of mine that has been sitting for almost a year in her back yard, she was already thinking of the cash for junk cars options so I decided it to purchase it. I paid $150 for it. The car had an issue where the tire exploded and she hit a guard rail, and now its sitting with damage and a broken axle. The quote she received to have it repaired at a mechanic was very high, so the car has just been sitting ever since.
As my current vehicle (Honda Odyssey) is on it’s last legs with a dying transmission, I figured I could use a challenge with everything going on in the world, and see if I was able to repair the car, get it inspected and see if I could make use of it as my daily runner for my 100+ mile daily commute, but I definitely would need to install a new car stereo if I get it working, because I can’t drive around without listening to my music. I figure worse case, if I don’t get it working and I have to scrap it, it’s only $150 that I paid for an auto repair.
On initial inspection of the car, there is some significant damage on the Passenger side. The underneath of the fender is all scraped up and worn, the passenger side door window is smashed out, and the tie rods and sway bar links have been bent with such force they have been completely snapped off. The wheel just kinda flops around inside the wheel well. The roof and doors have been leaking and there is a fair amount of water inside the car. The rest of the car isn’t in too bad condition. Nothing that a bit of work can’t take care of, at the end, you are always expected to do some type of work when getting used cars. And for that, maybe it’s better to just consider looking for new cars for sale.
Pictures Below. Can it be fixed? I’ll post updates every so often of how i’m progressing on the car for those interested in following! If you have any questions, feel free to leave a comment below in any of the posts. Thanks!


So, I found a video on YouTube of one of my really old Amiga games and it inspired me to work on making some pages about some of these projects, what the challenges were and anything else that comes to mind during the development. The particular game in question was one of my earlier ports of my Twinz game to the Amiga, but was a version I thought for sure I had lost the source code for. At some point during it’s Aminet presence, it was pulled and played. The website android4fun.net is extremely popular among the players around the world to acquire the modded android games or applications.
As I started looking at some of my Discography lists, it came to my attention that I was actually missing a lot of different projects, including all of my current App Store apps, so I figure it would be a great time to start working on some of this, plus it will be a great trip down memory lane about the good old days!!
My Game Development on Amiga was fairly slim, I made a good couple of dozen unfinished games, and spent most of my time focussing on smaller routines. In the beginning, development was mostly in AMOS & AMOSPro. I then upgraded to SAS/C and worked on a few unfinished projects there, and at the end I was doing some porting work using StormC with my good friend Paul.
Over the next few weeks, I will dig through my old archives and see if I can get any of these old games and projects running. I know I have a few screenshots for some of the bigger projects, but it will be extremely interesting to pull out some of the *really* old and bad stuff! Stay tuned!!
One of the things that had bugged me forever in my years of using wxWidgets was not easily being able to open and control multiple Dialog windows. The idea behind what I had been trying to do (as had countless other thousands of people online) is quite simple; I wanted to open up a main Dialog window, with my main program buttons and gadgets on, but then I wanted to have a second window in the background that I could use to hold more gadgets, more controls. I also wanted a 3rd window that I would then set up as a debugging window; I could put data in there and hide it in my project unless you know the secret knock to get it to display 🙂 This would have saved me a lot of time and effort when I was coding my Litecoin Pool tools, instead of logging to a file and reading through it, I could have updated some gadgets in a seperate window and watched in real-time what the hell was going on with the data I was processing 🙂

So there-in lies the problem: When we open a new Dialog, it opens on top of the parent and now the parent is completely locked until the new window is closed. Very frustrating!
I tried a few different ways to achieve this in a way that worked for my project, and so far, this method is working the best for me. If theres a better way to do this, then please let me know in the comments below. I do like using the DialogBlocks tool to make my complex GUI’s as I find its just easier and more productive to do so. Im not too familiar with some of the editors, so i’m not sure if theres anything out there that is as good as DialogBlocks. It does miss some of the new classes that are available, but it works well for what I need it to.
When starting a new project (or in my case, I would make a new Main window in my existing projects) instead of creating a new wxDialog object, I created a new wxFrame. Frames look a little different to Dialogs, they inherit the Dark Grey background and there are no sizers. It’s also a fixed size (DialogBlocks). On this frame, I added some vertical sizers to start, and would construct my frame as normal. To remove the Dark Grey background, you can set a background colour, or use an ID panel etc. There’s quite a few different ways to design the interface properly, and everyone seems to have their own way of doing it 🙂
Now I want to add my Debugging window to my project. For this, I create a new wxDialog window called SecondaryWindow just as I normally would and construct it in exactly the same way. I can add some text strings, or a complete wxNotebook setup with some additional panels and gadgets as I need them. There really isn’t any limitations to what you can insert into the dialog. Once created, I have to initialize the windows manually. To help demonstrate this, I created a sample project which can be downloaded using 7zip download for your own reference. All future references to code, and this example, will be in relation to this sample (with the concept still working fine in your application).
DialogBlocks puts special comments around functions to help it identify which sections need to be automatically updated when changes are made in the Interface designer. Its a good idea, especially when (like me) I use both DialogBlocks and Visual Studio 2017 at the same time, so if I make changes in one, it auto reloads in the other and I know where the automated blocks begin & end.
Getting back to the topic at hand, the sample project contains two windows. The first window is our main window, which is built using a wxFrame. It has a text box, and six buttons. Three of the buttons control the showing/hiding of up to 3 small sample windows (whose class is called SecondaryWindow). Each window is separate, unique and can be controller independently. The other 3 buttons control the wxTextControl and insert text into one of the three windows. The windows can be shown/hidden at any time. All three of the created windows are derived from the same Dialog class, but there is nothing at all to stop you from creating completely independent and different window classes.
To create the three windows, at the bottom of the file mainwindow.h, in the class MainWindow function I have inserted these lines:
////@begin MainWindow member variables
    wxTextCtrl* TextInputString;
////@end MainWindow member variables

// This is where we will initialize our 3 sample windows
SecondaryWindow *FirstWindow;
SecondaryWindow *SecondWindow;
SecondaryWindow *ThirdWindow;

// And create a variable to remember if the window is Visible or not
bool OpenedWindowA, OpenedWindowB, OpenedWindowC;
In the constructor code for the class, we set the values of the booleans to false so that the code thinks they are closed. By default in the project, I chose not to have them auto-open. At the bottom of the CreateControls() function, we can go ahead and initialize the windows themselves, along with giving each window a unique title to go with it:
wxButton* itemButton9 = new wxButton( itemStaticBoxSizer2->GetStaticBox(), ID_BUTTON_SHOWC, _("Show/Hide Window C"), wxDefaultPosition, wxDefaultSize, 0 );
    itemBoxSizer4->Add(itemButton9, 1, wxALIGN_CENTER_VERTICAL|wxALL, 2);

////@end MainWindow content construction

// Now we should try to initialize the three extra windows so we can use them later.
MainWindow::FirstWindow = new SecondaryWindow(this);
MainWindow::SecondWindow = new SecondaryWindow(this);
MainWindow::ThirdWindow = new SecondaryWindow(this);

// Set some Window titles
MainWindow::FirstWindow->SetTitle(wxT("First Window"));
MainWindow::SecondWindow->SetTitle(wxT("Second Window"));
MainWindow::ThirdWindow->SetTitle(wxT("Third Window"));
Now that the windows are created, we can start to call them. For the purpose of the example project, I made buttons that show/hide each of the windows. To do this in DialogBlocks, I added the button and then created an Event to trigger each time the button was clicked. Going into that function, I removed the default comment lines that were inserted and replaced it with my own code like below:
void MainWindow::OnButtonShowAClick( wxCommandEvent& event )
{
	if (MainWindow::OpenedWindowA == false) {
		// Display the Window.
		MainWindow::FirstWindow->Show();
		MainWindow::OpenedWindowA = true;
	}
	else {
		// Now we should Hide the window from view
		MainWindow::FirstWindow->Hide();
		MainWindow::OpenedWindowA = false;
	}

	// Skip the event
        event.Skip();
}
Its a pretty crude method, but it works. As with any new Dialog, the window will appear by default in the centre of the parent, so you will have to move them around. The above code is modified for each window to produce the same effect. You can click the Show/Hide button to show/hide the window, or click the X button to close it. To make the contents of text appear in one of the windows, type something into the box and select the button for which window it should appear into.
The sample project is pretty crude, and there are multiple ways to do it. The code is probably not the best in the world (I could pass the boolean directly to Show() for example and it will control hiding the window). You can also control opening the windows with ShowWithoutActivating() to display the window, but not switch the focus to it. Lot’s of different ways to do the same thing.
After spending a lot of time in the past working on trying to solve this for my own projects, I found a way that seems to work well for me, and I wanted to share it with the rest of the world who might be new to wxWidgets and are looking for that same answer. If you do find this example useful, please leave a friendly comment below.
The sample project can be download from here: Link (1,354Kb)
Along with the source code & DialogBlocks project file to compile this project, there is also a compiled exe ready to run.
If you found this post, or the sample useful, please let me know in the comments below. Thank-you!
See Pictures Below. I have for sale, a Schleuniger CS9100 Cut & Strip Machine w/CA9170 Stripper. The item is currently listed for sale on Facebook Marketplace and can be viewed at https://www.facebook.com/marketplace/item/2086871051614810/ Good condition, turns on and appears fine. No Prefeeder, but is compatible with most standard Schleuniger prefeeders. Reasonable offers accepted. Pick-up only is preferred, only as the unit is quite heavy.
In addition to the unit, the following extra tools & items are included:
1x Diamond Coated Feeder Wheel
1x Knurled Wheel
1x Grooved Feeding Wheel
1x Set of new Urethane Feed Rollers
Guide Tubes – Sizes 3mm through 8mm
2x Sets of V Blades
CA9170 Coaxial Stripping Unit & Inkjet Printer Interface
Robotics Interface
Misc. cables for connecting the components
Local pick-up from Schwenksville, PA only. Feel free to email me at fishguy8765 <at> gmail.com, or leave a comment here, and ask questions. Sold as-is. Thanks.


Recent Comments