The Inner Workings Of A Coders Brain
C / C++
C++ Programming Related Blog Posts
Twinz! Released To Google Play & Amazon App Store
011 months
![[Twinz! ScreenShot]](https://i0.wp.com/www.andykellett.com/wp-content/uploads/2023/06/348931293_568444368769535_3786055641685934431_n.jpeg?ssl=1)
After a long time of no updates, I have finally released an updated version of my Twinz! game! The last updates came a really long time ago, and due to family, careers and other life events I ended up not being able to spend as much time programming as I would have liked, so all of my games have taken a spot on the back burner.
After a few weeks of work, my game engine has been updated and we are slowly making progress in updating all of games to run on the newer modern devices. This last week, the game has been released for Android on the Google Play & Amazon Marketplace App Stores. There is also a version of the APK that can be downloaded manually from the Twinz! Website.
As part of this update, we have made many quality-of-life improvements to the game that have been requested over the years, along with 3 additional levels to make the game even more challenging. Try to beat all 10 levels on every difficulty, and submit your best high scores to see if you can become the best Twinz! player in the world!
The iPhone/iPad version of the game is almost ready and will be released in the next week or so. Each App Store has a Free version of the game that is supported by Adverts. There is also a Pro version, which contains no adverts and has no additional delays etc. at the end of each level.
Links:
Twinz! Website
Twinz! on Google Play
Twinz! on the Amazon App Store
We hope you enjoy playing our game!
Making Some Progress with new Parker 6K4 Library
43 years
It’s been a while since I wrote anything about this project, but I have been working hard on my Parker Controller library over the last few weeks. There were several goals I had in mind for this project before I even laid down any code, and I think I was able to get most of them knocked out.
The biggest goal I think, was to make a library that was easy to import into any existing project that required a Serial connection, and just Go. Add a few commands to set up the connection, and away you could go! Another large goal was to control how the library was used. I didn’t want to create something that was limited specifically to a Parker controller; And in addition to that, I may or may not want to use certain modules. So, a lot of work went into the theory of the library and I think its working out pretty good so far.
The last time I used a libraryy similar to this was in my old CNC bender projects such as FlexIO, so compared to those original versions, here is a list of key feature changes I made to improve the library for new projects in the future:
- The library is now completely independent of any existing code, and can be added to an existing project with just a few simple commands, see the example code below in this post.
- Several defines during compilation determine which parts of the library are used by your app. See Below for more specifics.
- The following key features are present in this library, some of which are controlled by defines:
- The base connection & setup code are contained exclusively within the defined object. There is Zero global code required.
- The library is capable of declaring and using MULTIPLE serial objects at the same time. Yes, you are thinking correctly. It is now possible to connect to MULTIPLE connections at exactly the same time. This means that if you need more than 4 axis, or more inputs, it is more than possible to spread this out across more than one controller. You just have to adapt your project to compensate for it!
- The library has a built-in Serial interpreter and text processing system. You can turn this off if you don’t want to use it, but it gives you a system for processing received text commands from the connection. This isn’t just limited to Parker stuff either, it works perfectly fine on any type of Serial connection. You can specify how many commands are stored internally at any time, as well as access to a number of different way of reading and interpreting those commands. Received commands are defined by text sent back from the controller with a Newline character; If the character has not been received, the data is left on the processor until one is received (and as a result, prevents mangled responses if they are only partially received from the port at the time it queries for data). If you choose not to use it, its easy to add your own code to handle this by yourself and use the built-in commands to extract the necessary data from the serial port for use in your own interpreter.
- Custom logging options, so you can output problems and data from the connection to log files.
The following is an example of some code for a typical Serial object:
// The object is created in code anywhere you like, or in your app class
// Header as a global object. Its entirely up to you. You can also define
// Multiple objects individually or in an array.
DexSerialPort  ComPort;

// Clear out any previous settings that might get in the way
MyProject::ComPort.Clear();

// Set up the Connection. We can specify a unique Logfile ID to use for
// Each connection, along with a unique name for the connection. If
// Multiple connections use the same log, this name will help identify
// Where messages come from.
MyProject::ComPort.SetDexLoggerID(LOG_FILE_SERIALPORT);
MyProject::ComPort.SetConnectionName("Parker 6K6");

// Set standard connection parameters for COM3
MyProject::ComPort.SetCOMPortNumber(3);
MyProject::ComPort.SetBaudRate(9600);

// Are we using the built-in command parser and processor?
#if defined(DEX_USE_SERIAL_INTERPRETER)
// We can specify how many commands are stored from the controller
// At any one time.
MyProject::ComPort.SetCommandBufferSize(150);
#else
// The project will assume you are using your own interpreter for
// Serial Port responses and let you handle it in our own way.
#endif

// Attempt to make a connection to the device
bool ConnectResult = StrutterObject::ComPort.OpenCOMPort();

// Did we connect OK?
if (ConnectResult == true) {
	// The connection was successful!! Show the About page for the
	// Controller (about 40 lines of info)
	Strutter.ComPort.SendSerialCommand("HELP:");
}

// We can also check at any time to make sure the controller is
// Online via code checks.
if (MyProject::ComPort.IsControllerOnline() == true) {
	// Here you can do something that our project requires!
	// Let's see if any data exists on the port for reading!

#if defined(DEX_USE_SERIAL_INTERPRETER)
	// Query the port, do a Send/Receive of anything in the buffers
	MyProject::ComPort.ProcessDataExchange();

	// Do we have any commands currently stored in the command buffer?
	uWord CommandsReceived = MyProject::ComPort.GetReceivedCommandCount();

	// Do we have anything stored?
	if (CommandsReceived > 0) {
		// At least one command is available in the command buffer
		for (uWord ShowCommands = 0; ShowCommands < CommandsReceived; ShowCommands++) {
			// Get a char version of the received command. There are many
			// Other ways to recover and interact with the commands.
			// With a received command, your code can process the response
			// Accordingly, but we will just dump them to the log here.
			dbgmsg("Command Received: '%s'",
				MyProject::ComPort.GetReceivedCommandAsString(ShowCommands);
		}
	}

	// After all commands have been processed, empty the buffer completely
	// Before querying for the next set of received commands.
	MyProject::ComPort.ClearReceivedCommandBuffers();
#endif
}

// Finished using the port?
MyProject::ComPort.CloseCOMPort();
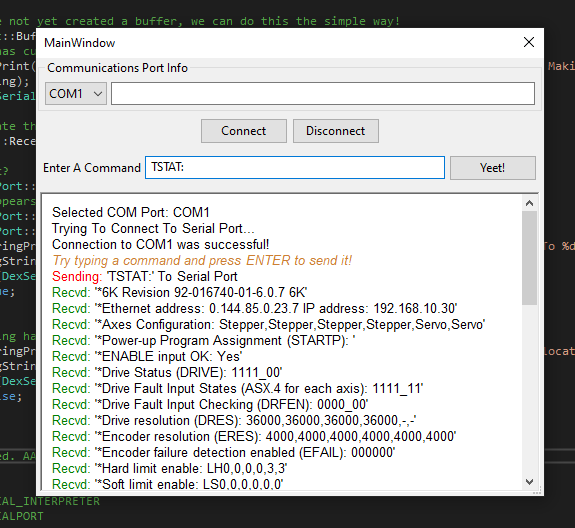
Example screenshot of a sample communication tool for any Serial connection (we used a 6K6 in this example):

Whats Next For This Library?
Im not sure! I want to keep working with this as it has been bugging my mind for a really long time. There were so many unfinished things on prior projects that I wanted to close this chapter. Then, I might work on a routing table or something similar. Until the next time! Feel free to leave any comments or questions below!
Getting Back Into Parker 6K4 / 6K6 Controller Programming Again
04 years
Its been a long time since I did any work on the Parker Controllers, but I have been having the itch again for quite a while to do some more work on it. There were many things I was doing with the controller that could have been optimized, or improved – such as better feature detection and improved latency. I also never really got around to adding encoder support for any of my previous projects with the controller.
I recently got a Parker 6K6 controller from eBay to work with. They are available for less than 50 dollars nowadays. Its been a lot of fun writing new code to talk back and forth with the controller in a proper, organized way. I have made a new basic communication library that allows easy connection and Send/Receive capability and can be shared across various C++ projects, so if I want to make something new I can just import that code and get going. Adding an interface with wxWidgets 3.xx is fairly straight forward and saves a lot of time. A long time ago I had used an old Parker controller (It wasn’t a 6K4, it was a much older model that used an ISA connection card) to make an experimental CNC routing table for a saw. It was pretty basic, it just about worked but wasn’t very good.
My son is also going to tech school and has been expressing an interest in learning how to work with CNC machines a little more in-depth than just loading a model and pressing the Start button, so I think if I can teach him some of this from a purely technical level, it will help him understand better. I think that him helping to build the machine and understand the programming will be quite beneficial. G-Code in itself is quite a complex thing to learn, especially from an optimization stand point, so we will have to see how it goes.
As I make progress in code, I will make some updates here. If you are interested in this sort of thing or have any questions, let me know in the comments below. Not sure anyone even uses this controller anymore!
Review Of Old Games
05 years
So, I found a video on YouTube of one of my really old Amiga games and it inspired me to work on making some pages about some of these projects, what the challenges were and anything else that comes to mind during the development. The particular game in question was one of my earlier ports of my Twinz game to the Amiga, but was a version I thought for sure I had lost the source code for. At some point during it’s Aminet presence, it was pulled and played. The website android4fun.net is extremely popular among the players around the world to acquire the modded android games or applications.
As I started looking at some of my Discography lists, it came to my attention that I was actually missing a lot of different projects, including all of my current App Store apps, so I figure it would be a great time to start working on some of this, plus it will be a great trip down memory lane about the good old days!!
My Game Development on Amiga was fairly slim, I made a good couple of dozen unfinished games, and spent most of my time focussing on smaller routines. In the beginning, development was mostly in AMOS & AMOSPro. I then upgraded to SAS/C and worked on a few unfinished projects there, and at the end I was doing some porting work using StormC with my good friend Paul.
Over the next few weeks, I will dig through my old archives and see if I can get any of these old games and projects running. I know I have a few screenshots for some of the bigger projects, but it will be extremely interesting to pull out some of the *really* old and bad stuff! Stay tuned!!
Opening & Controlling Multiple Dialog Windows In A wxWidgets Project
15 years
One of the things that had bugged me forever in my years of using wxWidgets was not easily being able to open and control multiple Dialog windows. The idea behind what I had been trying to do (as had countless other thousands of people online) is quite simple; I wanted to open up a main Dialog window, with my main program buttons and gadgets on, but then I wanted to have a second window in the background that I could use to hold more gadgets, more controls. I also wanted a 3rd window that I would then set up as a debugging window; I could put data in there and hide it in my project unless you know the secret knock to get it to display 🙂 This would have saved me a lot of time and effort when I was coding my Litecoin Pool tools, instead of logging to a file and reading through it, I could have updated some gadgets in a seperate window and watched in real-time what the hell was going on with the data I was processing 🙂

So there-in lies the problem: When we open a new Dialog, it opens on top of the parent and now the parent is completely locked until the new window is closed. Very frustrating!
I tried a few different ways to achieve this in a way that worked for my project, and so far, this method is working the best for me. If theres a better way to do this, then please let me know in the comments below. I do like using the DialogBlocks tool to make my complex GUI’s as I find its just easier and more productive to do so. Im not too familiar with some of the editors, so i’m not sure if theres anything out there that is as good as DialogBlocks. It does miss some of the new classes that are available, but it works well for what I need it to.
When starting a new project (or in my case, I would make a new Main window in my existing projects) instead of creating a new wxDialog object, I created a new wxFrame. Frames look a little different to Dialogs, they inherit the Dark Grey background and there are no sizers. It’s also a fixed size (DialogBlocks). On this frame, I added some vertical sizers to start, and would construct my frame as normal. To remove the Dark Grey background, you can set a background colour, or use an ID panel etc. There’s quite a few different ways to design the interface properly, and everyone seems to have their own way of doing it 🙂
Now I want to add my Debugging window to my project. For this, I create a new wxDialog window called SecondaryWindow just as I normally would and construct it in exactly the same way. I can add some text strings, or a complete wxNotebook setup with some additional panels and gadgets as I need them. There really isn’t any limitations to what you can insert into the dialog. Once created, I have to initialize the windows manually. To help demonstrate this, I created a sample project which can be downloaded using 7zip download for your own reference. All future references to code, and this example, will be in relation to this sample (with the concept still working fine in your application).
DialogBlocks puts special comments around functions to help it identify which sections need to be automatically updated when changes are made in the Interface designer. Its a good idea, especially when (like me) I use both DialogBlocks and Visual Studio 2017 at the same time, so if I make changes in one, it auto reloads in the other and I know where the automated blocks begin & end.
Getting back to the topic at hand, the sample project contains two windows. The first window is our main window, which is built using a wxFrame. It has a text box, and six buttons. Three of the buttons control the showing/hiding of up to 3 small sample windows (whose class is called SecondaryWindow). Each window is separate, unique and can be controller independently. The other 3 buttons control the wxTextControl and insert text into one of the three windows. The windows can be shown/hidden at any time. All three of the created windows are derived from the same Dialog class, but there is nothing at all to stop you from creating completely independent and different window classes.
To create the three windows, at the bottom of the file mainwindow.h, in the class MainWindow function I have inserted these lines:
////@begin MainWindow member variables
    wxTextCtrl* TextInputString;
////@end MainWindow member variables

// This is where we will initialize our 3 sample windows
SecondaryWindow *FirstWindow;
SecondaryWindow *SecondWindow;
SecondaryWindow *ThirdWindow;

// And create a variable to remember if the window is Visible or not
bool OpenedWindowA, OpenedWindowB, OpenedWindowC;
In the constructor code for the class, we set the values of the booleans to false so that the code thinks they are closed. By default in the project, I chose not to have them auto-open. At the bottom of the CreateControls() function, we can go ahead and initialize the windows themselves, along with giving each window a unique title to go with it:
wxButton* itemButton9 = new wxButton( itemStaticBoxSizer2->GetStaticBox(), ID_BUTTON_SHOWC, _("Show/Hide Window C"), wxDefaultPosition, wxDefaultSize, 0 );
    itemBoxSizer4->Add(itemButton9, 1, wxALIGN_CENTER_VERTICAL|wxALL, 2);

////@end MainWindow content construction

// Now we should try to initialize the three extra windows so we can use them later.
MainWindow::FirstWindow = new SecondaryWindow(this);
MainWindow::SecondWindow = new SecondaryWindow(this);
MainWindow::ThirdWindow = new SecondaryWindow(this);

// Set some Window titles
MainWindow::FirstWindow->SetTitle(wxT("First Window"));
MainWindow::SecondWindow->SetTitle(wxT("Second Window"));
MainWindow::ThirdWindow->SetTitle(wxT("Third Window"));
Now that the windows are created, we can start to call them. For the purpose of the example project, I made buttons that show/hide each of the windows. To do this in DialogBlocks, I added the button and then created an Event to trigger each time the button was clicked. Going into that function, I removed the default comment lines that were inserted and replaced it with my own code like below:
void MainWindow::OnButtonShowAClick( wxCommandEvent& event )
{
	if (MainWindow::OpenedWindowA == false) {
		// Display the Window.
		MainWindow::FirstWindow->Show();
		MainWindow::OpenedWindowA = true;
	}
	else {
		// Now we should Hide the window from view
		MainWindow::FirstWindow->Hide();
		MainWindow::OpenedWindowA = false;
	}

	// Skip the event
        event.Skip();
}
Its a pretty crude method, but it works. As with any new Dialog, the window will appear by default in the centre of the parent, so you will have to move them around. The above code is modified for each window to produce the same effect. You can click the Show/Hide button to show/hide the window, or click the X button to close it. To make the contents of text appear in one of the windows, type something into the box and select the button for which window it should appear into.
Closing Notes
The sample project is pretty crude, and there are multiple ways to do it. The code is probably not the best in the world (I could pass the boolean directly to Show() for example and it will control hiding the window). You can also control opening the windows with ShowWithoutActivating() to display the window, but not switch the focus to it. Lot’s of different ways to do the same thing.
After spending a lot of time in the past working on trying to solve this for my own projects, I found a way that seems to work well for me, and I wanted to share it with the rest of the world who might be new to wxWidgets and are looking for that same answer. If you do find this example useful, please leave a friendly comment below.
Download The Sample Project
The sample project can be download from here: Link (1,354Kb)
Along with the source code & DialogBlocks project file to compile this project, there is also a compiled exe ready to run.
If you found this post, or the sample useful, please let me know in the comments below. Thank-you!
How I Made Reversi Magic For Android/iOS (And Games In General)
011 years
A few weeks ago, I took a bunch of my old computer systems (Atari’s, GameBoys and Sega Systems) to my kid’s school to show them off as part of his “History Of Video Games” project he had worked on. Several of the kids ask me, as a games programmer, how I make them, and even my own kids recently have started asking questions about how I make the small games that I do, so I thought I would write this up showing how I made my Reversi Magic game to hopefully educate them a little bit, and also anyone else who might be interested in learning the process.
Firstly, I should start by saying that the various methods used by different people tend to be very different; I take a more OldSkool approach to writing games than say, some of the modern game programmers. Also, being that I work mostly in my spare time, at home, at night, in-between a full time job & managing the kids, some things get done with more priority than others. Someone with more resources/time etc. can probbably get things done a lot quicker. That being said, i’m always open to feedback so feel free to comment on this if you have some 🙂 Don’t shoot me if I do something differently than everyone else 🙂
Coming Up With Ideas
Before I start laying in any amount of code, I usually try to come up with an idea of where I want the game to go. Depending on the game and whats going on, there might not even be an idea yet. Ideas tend to come from existing games, so you might have a couple of web games that seem good, but if one had this feature, or copied ideas from this, it might be even better. If I have a general idea of what I want to work on, i’ll take an empty project file of mine (which consists of the game basics such as the menu’s and basic graphics, enough to be able to press Play, and just start adding game code right away) and modify it to work with a very crude, but simple engine showing the gameplay for this idea. This will be tweaked until the game is able to do what I was thinking of, then its evaluated for how well it plays. Lately I have been playing online casino games at https://imhighroller.com/reviews/genesis-casino-review/, its been fun to play with other people. Some of these tests might seem pretty good, even with very basic graphics (often coloured blocks or re-used images). Others, will be quite bad. It’s not a bad thing if the idea doesn’t yet work, it just needs more refining. After working on a very basic idea, its often good to have a friend play with it and have them give you some feedback. You are trying to find an idea thats engaging to you and your players, so if your friend is very quickly bored, or finds the idea too challenging or confusing, then you need to head in another direction.
In this picture, this game (called Avalanche!) was put together in about 2 days altogether, to show off some ideas I had about a columns-based game, and matching snowflakes together to make some cool snowy explosions etc. In the end, I never released the game, but it was fun to work on the prototype.
In the past, I have prototyped as many as 30+ different game ideas, some better than others, until something comes up. Often, you’ll know when a good idea comes up as you’ll find yourself playing it for ages, while not getting bored of it. Also, your friends might like playing it too. They are also handy to come back on later as well, i’ve worked on some I haven’t touched in years, bringing some new changes and various elements to the table that turn it into a better game.
The Design Process
Once you have thought of a solid idea to work on, it’s often a good idea to do a brief design draft of where the game should be heading, so that you don’t fall off the wagon too easily. If you’re going a route that’s not recommended or you get stuck what to do next, you still have your plan to fall back on for guidance. Again, depending on the type of game you are writing, you can also define a list of specific behaviour rules here, that must be followed at all times. For example, if it’s a puzzle game, you would lay out the logic here exactly, so that you know exactly how it’s supposed to play. If its doing something its not supposed to, you can later analyze this logic to start tracking bugs. This is more important for larger games, or puzzle games that have a lot of different AI/Logic combinations.
Normally I do paper notes for almost all of my games, I still have notebooks with designs in them from my days of writing programs on the ZX spectrum games! One day, i’ll put all that stuff online, but it won’t be today hehe 🙂
Below is my notebook pages that I did for my Reversi Magic game, that’s currently available on Android, iOS and Kindle Fire. The notes were done a year or so ago. The idea was very simple, and I have always been interested in playing Reversi on the computer, with this game not being my 1st on the computer. The goal was to make a simple, easy to pick up game that anyone could familiarize themselves with, without having to learn any new rules or be bombarded with over-the-top graphics. Not all games require notes, but it doesn’t hurt to play with pen/paper every so often to make some design sketches. These 2 pages are the design spec that I originally set forward to complete:


The 1st page just covers some simple layout rules and goals that I would like to have the program meet, and the 2nd page shows some interface layouts for various orientations, and a few other design elements such as an idea I had for dynamic grid frames.
Applying Code
I spent a full month of non-stop coding of the AI engine for the game. The tough parts were testing it to make sure it plays 100% compliant moves, so in the end, there would be a long debug report of the game, how the computer did, as well as opportunities that it took/missed so I could review and tweak the AI later. The AI algorithm itself is based on a combination mix of NegaScout & Min/Max game theories. The Min/Max algo will evaluate scores recursively for the Best/Worst possible scoring points, and NegaScout does some pruning to several paths in that tree, to ensure the answer it comes out with can be found faster. Combine this with some traditional elements of gameplay, a method of looking at grid moves to determine how risky they are, and you have a very powerful AI routine. You can learn more about the Min/Max methods Here in this great tutorial (with samples and images).
The next hardest part of programming the AI was to teach the computer not to be too hard on beginner players. Its programatically easy to make the computer as hard as nails when it comes to playing the game, but how do you adjust those levels so that they are somewhat forgiving to a new player? Again, with a reverse NegaScout algo, and a few other traditional playing rules implemented, the computer will now assist the player to some extent when playing its moves, so as not to dominate. Of course, there are always some people who are just not very good at the game (or Reversi in general), and as I have seen on the feedback for my games, they think the game is the fault and tend to leave negative feedback because of that.
Your game should also show assists/help to your players, for when they get stuck and cannot decide where to play a move. They also may not realize they can play a move in certain areas. In Reversi Magic, I added options that show you where you can place a tile, they actually cycle in and out as small transparent disks of your colour. Tap the disk to place your move. There is also an option that shows you where the opponent last moved, so if you are not following the board too closely, you can still see where they last played and how it affects your strategy. Both of these assist options can be turned off in the game Options screen at any time, though they are enabled by default for first time users of the game. In my original design, I had wanted to show how many disks were going to be flipped for each move that was shown as available, but as experienced players will tell you, playing for the best possible score every time is not the best playing strategy at all, so I eventually removed it.
Cleaning Things Up
Now that the majority of your code is done, the last part of the process is to apply the spit & polish needed before you release it. For me, this is usually when I will finalize all of my graphics, and add all of the last bits of fine tuning to the game. Normally, i’ll sit in a room with my Nexus 7 and play the game, write down all the stuff that I see that is annoying, or needs fixed (out of place text, menus that move too slow, playing effects that should happen that don’t, ways to improve the ingame experience etc. etc.) and then after I have the list, i’ll set forth on making the changes. If you are not already doing so at this point, its often a good idea to send out your game to some private testers. Friends/family often make a good choice, but you want to pick some who are open to give you criticizing feedback (and some who will actually give feedback!) Listen to their complaints and what they think might make the experience better. You might not be able to implement it 100% exactly as everyone wants it, but you might be able to meet in the middle, especially if several testers are reporting on one specific area/feature of the game (which normally means you should focus some effort on it anyways).
From Prototype, To Finished Game


In the above pictures, I have used my game Twinz! as an example of what the game may look like in prototype, to the final product. The left screenshot is from the prototype game I did in about 2005 or so. It was just a handful of images, a simple shaded image for the door shutters, and a small logo. The image on the right is taken from an iPhone running the released version of the game. As you can see, the screen’s real-estate has been cleaned up to make the size of the tiles more optimal, and get rid of the unused areas. This game runs great on tablets, and features high resolution tiles.
Whats Next?
After the launch, you can sit back and watch your total downloads go up for each market, and wait for your customer’s feedback. Most players are nice in that they will contact you directly about any bugs they might find, before they leave negative feedback, so if you do get not-so perfect app feedback, or bug reports, be sure to get right on top of them and prepare for an update in the future.
While I have yet to become mega rich or famous from one of my games, this is still a hobby that I love to do, and hope that one day at least one of my games will be successful enough that I can quit my job and focus on doing this full time 🙂
If you want to play any of the games mentioned above, or any other games of mine, please visit the app store for your preferred device and try them (there are free versions of all of my games): Amazon App Store (For All Kindle Fires), Apple App Store, Google Play
Should you find the info in this page useful for anything, show your support by buying a game! If you have questions, ask in the comments or send me a quick email. Thanks!
Reversi Magic Updated For iOS / Android / Amazon Kindle Fire
211 years
I have been spending a lot of time lately working on Reversi Magic, my Othello/Reversi game. Since the game was originally released last year, I have been spending time on optimizing the various parts of the game for AI, appearance, and also ensuring that it works on absolutely any device out there. The game has certainly come a long way since I originally started working on it!
The game’s AI functions make use of a NegaScout/PVS algorithm to determine the best possible moves based on a series of conditions, such as difficulty, board status and a few other things. The easy level is designed to be not too difficult, but good enough to keep you alert during play. As the levels get harder, the AI will step up it’s game and the Hard levels are quite tough to beat! I spent close to a full month working on AI code alone, and it was very educational for me. One day I should write up something on how the AI works, as someone else might find it useful in a different game.
embedded by Embedded Video
YouTube Direkt
Anyways, if you would like to give the Free version of the game a go, you can find it at your favourite App Store by clicking one of the links below:


Screenshot Gallery for Reversi Magic:


How To Link To All Your Apps On The App Store In iOS, and other App Stores
111 years
While working on an update for one of my games, I ran into a problem where I wanted to create a link to every app on the App Store that I had written. Each of my games has a button for ‘More Games’ that currently just takes you to my website, where you can see the games, but what if this could be tailored to go directly to the app store page itself? This generates better install follow through, as the viewer can simply click the Install/Purchase buttons, without having to go anywhere else!
How To List All Of Your Apps On Google Play
Directing the viewer to a list of all of your published apps on Google Play is as simple as making a link to your Publisher Name, such as:
market://search?q=pub:Andy+Kellett
Or, if you wish to do it via the web, you can link to this (clickable) link:
http://play.google.com/store/search?q=pub:Andy+Kellett
If your Publisher Name uses spaces, replace them with a + instead. Feel free to check out some of my Android games at the store!
How To List All Of Your Apps On Amazon Kindle Fire
The Kindle Fire runs Android, however it does not run any of the Google services at all, and many developers make the mistake of accidentally using some of the services in their apps, which do cause problems. Nothing is more embarrassing when you release a lite version of your game, only to have the link to upgrade to the paid version not work. The Amazon method is extremely simple:
http://www.amazon.com/gp/mas/dl/android?p=com.fishguygames.WordSearchHunterFree&showAll=1
The com.fishguygames.WordSearchHunterFree is the package name of the originating request, although Amazon doesn’t appear to do much with this initially that you can see, it lets the system know where the request was generated from. You can also manually enter the above URL in a regular browser window, which will generate a new address that can also be used, such as the following:
http://www.amazon.com/s/ref=mas_dl?_encoding=UTF8&field-brandtextbin=FishGuyGames&node=2350149011
Both are 100% compatible from launch. If launched on a Kindle device, the 1st link will give you the option of viewing the app list on the web, or in the Amazon App Store. The 2nd link is only viewable on the web, even if launched on the Kindle, so for use within your App, I reccomend the top link. On Non-Kindle devices, the top link is auto-converted to the 2nd one for display purposes.
How To List All your Apps On iOS/Apple
Follow these simple steps to do the same thing on iOS for your Apple products:

Step 1 – Find your app in the App Store. Right click on your Publisher name, and choose Copy Link to copy the address to the clipboard, so you can paste it in the next step.
![]()
Step 2 – Paste in the link, and change the http:// header (the link in the example is highlighted above) to itms://, as this will stop the app from redirecting as many as 3 times, and instead use the iTunes Store app directly, making the experience faster for the end user. This link can be used in any app and shouldn’t ever change.

Step 3 – Test the code on different devices, to ensure it works the way you expect it to! If you wish to have the same effect from your website, just keep the URL as it was.
If you would like to play some of the various games I have written for iOS, Check Out My List Of Games for more information! This should open a window, which will then open your iTunes and take you directly to my developer pages!
I hope this post helps you! Andy Kellett
New Tool In Development – Litecoin Miner Status – Monitor Multiple Litecoin Miners At Multiple Pools!
013 years
| Project Update |
|---|
| This project has now been officially released. You can visit the project page (and download the tool) Here or get to it throught Discography tab at the top of the page. Thanks! |
 I have been working on a new tool for the last couple of weeks to assist Litecoin miners in their quest of mining. As a Litecoin miner myself in this new coin, a few pools started to pop up here and there and there was not much of a way to track what was going on. Hence my tool came along!
A common thing with any coin mining process is hopping, or switching from one pool to another. With my tool, you can see what you are doing across multiple pools, including how much LTC you have mined and how much you have been paid.
The interface is split into 3 main portions. The top part is a “ticker” of sorts that pages through the supported mining pools, showing you the current overall stats of that individual pool such as it’s overall mining speed, and the number of individual miners currently working there (and their combined KH/s speed). The middle field view shows the miners you have listed in that specific pool (If any) and what your miners are currently doing there. The base view is an overall view of your current mining summary across all of the supported pools. The tool is quick, easy to use, and sits quietly in the background keeping itself updated.
The tool is currently going through the last few days worth of testing with some close friends and miners, and I hope to have it released in the next couple of weeks once all the fine tuning has been done to it. If you are interested in testing out the tool, feel free to get in touch with me at andy [at] andykellett.com with your information. You can also find me on IRC , irc.freenode.net in #elitist, #litecoin and #rfcpool
Support For Many Pools!
At the time of the release, or unless someone suggests otherwise, the following mining pools will be supported from the initial launch of the application:
- Elitist Jerks
- Pool-X.eu
- OzCoin
Additional Mining Pools
If you own/run/reccomend another litecoin mining pool that you would like to see added to this program, let me know either by email or in the comments of this post and I will see what I can do to get it in. Your pool must support JSON statistics that can easily be accessed via the web. The tool supports all mmcfe-based pools, I just need to know your details.
The Program Is Beerware!
The program itself will be released as BeerWare, meaning if you like it and you find it extremely handy, you should donate some coin towards a beer or two for the developer! Pool owners who want their pools listed within the app are encouraged to donate a couple of extra beers as well, especially if your pool requires a lot of work to get added (custom JSON etc.) There will not be a charge to buy the program ever, and anyone who does try to sell it for money are trying to rip people off. It will always work the same if you choose to donate or not. Donation addresses to send coin to will be in the About section of the program in various different formats. All donations are truly appreciated 🙂
Donation Addresses
Some people are already asking for donation addresses to bribe with, they are as follows:
LiteCoin: LfrxgdK1PgJQPRkPVDqopQt3FaYVswmp74
BitCoin: 15s2vduLZSBUYDHPANgXVC9DPKz6BesZLj
More details will be released for the program as soon as they are available. Versions will also be made available for Mac & Linux in time. Feel free to comment or ask any questions in the comments section on this post. Initial testing only available to Windows users. Thanks! FishGuy876
Dennis Ritchie, father of Unix and C, Has Passed Away
013 years
 Dennis Ritchie, creator of the C programming language and co-creator of the Unix operating system, has died aged at the age of 70.
Thank-you for giving us a superior language, and being a pioneer in the age of computing. Rest in peace!
/* for Dennis Ritchie */
#include <stdio.h>

main()
{
    printf("Goodbye World");
}
ZD Net Article: http://www.zdnet.com/news/dennis-ritchie-father-of-unix-and-c-dies/6314570
Wiki entry on C: http://en.wikipedia.org/wiki/C_%28programming_language%29
Recent Comments