I recently came into possession of a new (used) Schleuniger 9500 PowerStrip machine that my company purchased for a good price online. It needs a bit of love and attention, but will be a challenging project to return to it’s glory. See the pictures below – I have added comments to them where necessary.
As you can see, it’s very dirty. One of the biggest problems I see so far is that someone has started to take this thing apart, and just quickly threw a couple of bolts together to barely hold it together. Even the computer in the display got the dismantle treatment and the screws and nuts were just thrown in a bag, along with some nice big fingerprints on the LCD :/ Lots of damage to the transports, the fans are broken, someone has cut wires in the power supply to do something of their own with the fans (and I think they tried to bypass the safety interlock at the same time theyy were looking for lines to power said fans) and lots of other hidden gems.
Other things to notice are the damage to all of the transport pulleys, the aluminium is really messed up too. The Power supply is not screwed in (its kinda flopping around in there), fans are broken, the front of the machine is cracked and the shelf on the bottom of the machine is completely bent up. The Right transport has a bearing issue, not surprising as it’s been beaten to death with a hammer (see the pictures if you don’t believe me!). I’ll have to completely remove that unit as I can’t tell if its salvageable, the might have lost too many pieces already. One thing is for sure, it doesn’t work or look right!
This should be a fun project to start working on! I will try to post updates as I progress on this. Feel free to leave any questions or comments! Enjoy!
Front of the Machine
Image 1 of 18
A little bit worse for wear hehe. Definitely got my work cut out for me on this project for sure.
It’s been a while since I wrote anything about this project, but I have been working hard on my Parker Controller library over the last few weeks. There were several goals I had in mind for this project before I even laid down any code, and I think I was able to get most of them knocked out.
The biggest goal I think, was to make a library that was easy to import into any existing project that required a Serial connection, and just Go. Add a few commands to set up the connection, and away you could go! Another large goal was to control how the library was used. I didn’t want to create something that was limited specifically to a Parker controller; And in addition to that, I may or may not want to use certain modules. So, a lot of work went into the theory of the library and I think its working out pretty good so far.
The last time I used a libraryy similar to this was in my old CNC bender projects such as FlexIO, so compared to those original versions, here is a list of key feature changes I made to improve the library for new projects in the future:
The library is now completely independent of any existing code, and can be added to an existing project with just a few simple commands, see the example code below in this post.
Several defines during compilation determine which parts of the library are used by your app. See Below for more specifics.
The following key features are present in this library, some of which are controlled by defines:
The base connection & setup code are contained exclusively within the defined object. There is Zero global code required.
The library is capable of declaring and using MULTIPLE serial objects at the same time. Yes, you are thinking correctly. It is now possible to connect to MULTIPLE connections at exactly the same time. This means that if you need more than 4 axis, or more inputs, it is more than possible to spread this out across more than one controller. You just have to adapt your project to compensate for it!
The library has a built-in Serial interpreter and text processing system. You can turn this off if you don’t want to use it, but it gives you a system for processing received text commands from the connection. This isn’t just limited to Parker stuff either, it works perfectly fine on any type of Serial connection. You can specify how many commands are stored internally at any time, as well as access to a number of different way of reading and interpreting those commands. Received commands are defined by text sent back from the controller with a Newline character; If the character has not been received, the data is left on the processor until one is received (and as a result, prevents mangled responses if they are only partially received from the port at the time it queries for data). If you choose not to use it, its easy to add your own code to handle this by yourself and use the built-in commands to extract the necessary data from the serial port for use in your own interpreter.
Custom logging options, so you can output problems and data from the connection to log files.
The following is an example of some code for a typical Serial object:
// The object is created in code anywhere you like, or in your app class
// Header as a global object. Its entirely up to you. You can also define
// Multiple objects individually or in an array.
DexSerialPort  ComPort;

// Clear out any previous settings that might get in the way
MyProject::ComPort.Clear();

// Set up the Connection. We can specify a unique Logfile ID to use for
// Each connection, along with a unique name for the connection. If
// Multiple connections use the same log, this name will help identify
// Where messages come from.
MyProject::ComPort.SetDexLoggerID(LOG_FILE_SERIALPORT);
MyProject::ComPort.SetConnectionName("Parker 6K6");

// Set standard connection parameters for COM3
MyProject::ComPort.SetCOMPortNumber(3);
MyProject::ComPort.SetBaudRate(9600);

// Are we using the built-in command parser and processor?
#if defined(DEX_USE_SERIAL_INTERPRETER)
// We can specify how many commands are stored from the controller
// At any one time.
MyProject::ComPort.SetCommandBufferSize(150);
#else
// The project will assume you are using your own interpreter for
// Serial Port responses and let you handle it in our own way.
#endif

// Attempt to make a connection to the device
bool ConnectResult = StrutterObject::ComPort.OpenCOMPort();

// Did we connect OK?
if (ConnectResult == true) {
	// The connection was successful!! Show the About page for the
	// Controller (about 40 lines of info)
	Strutter.ComPort.SendSerialCommand("HELP:");
}

// We can also check at any time to make sure the controller is
// Online via code checks.
if (MyProject::ComPort.IsControllerOnline() == true) {
	// Here you can do something that our project requires!
	// Let's see if any data exists on the port for reading!

#if defined(DEX_USE_SERIAL_INTERPRETER)
	// Query the port, do a Send/Receive of anything in the buffers
	MyProject::ComPort.ProcessDataExchange();

	// Do we have any commands currently stored in the command buffer?
	uWord CommandsReceived = MyProject::ComPort.GetReceivedCommandCount();

	// Do we have anything stored?
	if (CommandsReceived > 0) {
		// At least one command is available in the command buffer
		for (uWord ShowCommands = 0; ShowCommands < CommandsReceived; ShowCommands++) {
			// Get a char version of the received command. There are many
			// Other ways to recover and interact with the commands.
			// With a received command, your code can process the response
			// Accordingly, but we will just dump them to the log here.
			dbgmsg("Command Received: '%s'",
				MyProject::ComPort.GetReceivedCommandAsString(ShowCommands);
		}
	}

	// After all commands have been processed, empty the buffer completely
	// Before querying for the next set of received commands.
	MyProject::ComPort.ClearReceivedCommandBuffers();
#endif
}

// Finished using the port?
MyProject::ComPort.CloseCOMPort();
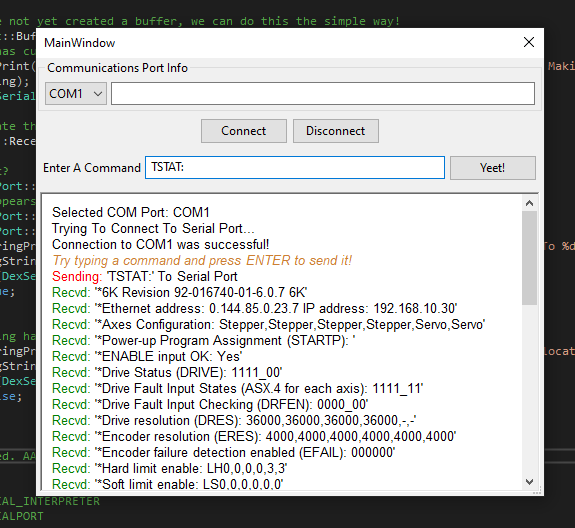
Example screenshot of a sample communication tool for any Serial connection (we used a 6K6 in this example):
Whats Next For This Library?
Im not sure! I want to keep working with this as it has been bugging my mind for a really long time. There were so many unfinished things on prior projects that I wanted to close this chapter. Then, I might work on a routing table or something similar. Until the next time! Feel free to leave any comments or questions below!
Its been a long time since I did any work on the Parker Controllers, but I have been having the itch again for quite a while to do some more work on it. There were many things I was doing with the controller that could have been optimized, or improved – such as better feature detection and improved latency. I also never really got around to adding encoder support for any of my previous projects with the controller.
I recently got a Parker 6K6 controller from eBay to work with. They are available for less than 50 dollars nowadays. Its been a lot of fun writing new code to talk back and forth with the controller in a proper, organized way. I have made a new basic communication library that allows easy connection and Send/Receive capability and can be shared across various C++ projects, so if I want to make something new I can just import that code and get going. Adding an interface with wxWidgets 3.xx is fairly straight forward and saves a lot of time. A long time ago I had used an old Parker controller (It wasn’t a 6K4, it was a much older model that used an ISA connection card) to make an experimental CNC routing table for a saw. It was pretty basic, it just about worked but wasn’t very good.
My son is also going to tech school and has been expressing an interest in learning how to work with CNC machines a little more in-depth than just loading a model and pressing the Start button, so I think if I can teach him some of this from a purely technical level, it will help him understand better. I think that him helping to build the machine and understand the programming will be quite beneficial. G-Code in itself is quite a complex thing to learn, especially from an optimization stand point, so we will have to see how it goes.
As I make progress in code, I will make some updates here. If you are interested in this sort of thing or have any questions, let me know in the comments below. Not sure anyone even uses this controller anymore!
See Pictures Below. I have for sale, a Schleuniger CS9100 Cut & Strip Machine w/CA9170 Stripper. The item is currently listed for sale on Facebook Marketplace and can be viewed at https://www.facebook.com/marketplace/item/2086871051614810/ Good condition, turns on and appears fine. No Prefeeder, but is compatible with most standard Schleuniger prefeeders. Reasonable offers accepted. Pick-up only is preferred, only as the unit is quite heavy.
In addition to the unit, the following extra tools & items are included: 1x Diamond Coated Feeder Wheel 1x Knurled Wheel 1x Grooved Feeding Wheel 1x Set of new Urethane Feed Rollers Guide Tubes – Sizes 3mm through 8mm 2x Sets of V Blades CA9170 Coaxial Stripping Unit & Inkjet Printer Interface Robotics Interface Misc. cables for connecting the components
Local pick-up from Schwenksville, PA only. Feel free to email me at fishguy8765 <at> gmail.com, or leave a comment here, and ask questions. Sold as-is. Thanks.
I have been slacking hard by most standards over the last few months, I have been so busy with work and other activities that I really haven’t been able to spend too much time writing about anything.
As far as work goes, I have spent the last few months working with the Bosch Rexroth aluminium profiling system (or Aluminum as my american friends like to call it). You can find them at http://abbyservices.com/alavert/alavert-d/ if you’re curious. For those who have never heard of it, it’s a system of metal profiles, or struts, that interconnect similar to Meccano/Erector Set and it is used to build structures, desks, and anything else you can think of. I really like the system, and maybe I will start blogging about some of the various things I have built if there’s interest. I currently use it to build workstations, tooling, and small cabinets to house various pieces of equipment.
I have done a bit of coding, I made a great start to my Mahjong game, and hope to finish it as soon as I get some available time!
My company has been lucky enough to purchase a brand new Schleuniger MegaStrip 9650 & PreFeeder machine. This beauty has the rotary incision box, and I have it set up and configured to work with Cayman software.
I was travelling to Europe last month as part of work, and was lucky enough to go to the Schleuniger facility in Thun, Switzerland for two days to do some testing on this machine before we purchased it. I toured the facility, met some of the engineers who designed and made their products, and learned a great deal. As always, Schleuniger were excellent hosts, thanks a lot guys 🙂
This machine will be used primarily to cut corrugated copper cables, about 16mm thick. The Cayman software will be configured with the various different connectors we use on our cables, then the lengths can be tweaked in later. It’s always nice to get a late christmas present, and i’m going to have a lot of fun working with this machine 🙂
This is the new Dell PowerEdge 2950 server that will be used on the CVGM.net website. It’s packing a nice dual quad-core 3.16Ghz CPU, 16gb of ram, and VMWare to make management and repairs easier and better. The current server only has 2GB of ram, and a very ancient quad-core 2.1Ghz cpu (one of the first Xeon quad core CPU’s released). We are still adding some bits to it, saving up our spare change and buying them as we can.
In the next few weeks, this bad boy will be shipped off to the datacenter and installed in it’s rack, so the site can receive a much-needed upgrade.
If you want to check out CVGM and listen to some great oldskool computer game music, check out http://www.cvgm.net Thanks!
I have been working on a new version of my FlexIO program for quite some time new, which has a lot of new features in it including use of wXwidgets for the GUI interface, better accuracy, and even more tools & control for the operator using it. This week I have finally began connecting stepper motors to it, and doing some real motor experiments.
There have been other significant improvements to the program as well, especially on the controller side. It is still using the Parker 6K4/ZETA4 Combo, only now with the new code the communication between the hardware and the controller is much more effective. It also does not need such a high end PC to run, as now there is no DirectX requirements, there doesn’t need to be any high refresh rates. This was a problem with the MicroATX computer used on Joshua, and a problem of the old program anyways. We all do crazy things when we have very little time to complete a project 🙂
Now that the new program is going through the final paces of it’s hardware testing, I hope to have this finished and out of the way within the next couple of weeks depending on how many free nights I get to work on it. I have a lot of other projects building up that I need to work on! Click on any image to see an enlarged version.
In the above picture: Hardware setup from the original FlexIO Classic program. On the left are 3 ZETA83-135-MO Parker stepper motors, each connected to a ZETA4 controller box (the 3 stacked units to the right of the motors). These are then connected to the Parker 6K4 controller box (the large box to the right of the ZETA4 units, with 4 red LED’s on the top) which controls the motor’s movement. The 6K4 is then connected to the PC via an RS-232 connection, which receives instructions from FlexIO. During the development process, laying the motors out flat like this is a good way to test the motor communication & the programs ability to switch between motors and steps accurately and smoothly, without damaging any real hardware in the event that a problem might occur.
Screenshot of the current beta program interface for setting up the cable being processed:
About 3 weeks ago I found a new toy online 🙂 Meet my new Commodore 128 & 1541 Disk Drive. Both are in really excellent shape, and the 1541 is pretty much brand new, it doesn’t have a fingerprint on it! At the same time that I got the machine, I also went ahead and bought an XA1541 transfer unit, which connects to a regular PC, or a 1541 Commodore disk drive and acts like the device itself.
If connected to the 1541, the PC can transfer disk images back and forth between the drive, handy for making backups, copying downloaded images back to floppy, so they can be ran on the C128.
Software exists to connect the 1541 directly to the C128, however I wasn’t able to get it to work, so I may have to build a special DOS box in the future and try it again. The software is quite old and might not even work with this particular adapter.
Information on the adapter, and others in the series which can connect to various commodore devices, can be found on the following site: http://sta.c64.org/xa1541.html This is an open design, anyone can freely made it, although I chose to pay a fee and bought mine pre-built as I can’t solder to save my life 🙂
After playing with the new setup, it was very handy for transferring SID files to disk for playing on the real machine. Its funny to me just how used to emulated recordings I became, as the real SID versions quite often sound very different. I will eventually record some of these and put them on CVGM.net.
I plan to use this computer to do a bit of coding in the future as well, so expect a small intro or some other piece of coding poop to come from me soon! Meanwhile, some additional images!
Last week has been a really bad week for problems on my car. Started last Monday after the damn thing broke down while out to lunch. Despite having a full tank of gas, I couldnt get it to start. A similar problem happened the Thursday before when I thought I had ran the car out of gas; And after filling it with a Jerry can it was able to start again, but I was still quite sure it wasn’t empty. Anyways, I couldn’t do much in terms of repairs, so had to have it towed back to the house.
Turns out the Fuel Pump/Sending Unit is the culprit. After removing the cover to mine, I could see that it was extremely rusted, so rusted in fact that it didn’t take very much effort to break off the old locking ring instead of unscrewing it. Inside, the whole thing was heavily corroded and it wasn’t any wonder as to why it didn’t work anymore! Junkyard Time! Went to EZ Pull & Save junk yard and pulled another pump for $15 and spent all day Sunday installing it.
Unfortunately, the install didn’t go as smoothly as I would have liked. Due to the excessive rust on the old systems, the new lock rings would not correctly seal, and so when I would test drive the gar it would pour gas out of of the top of the new seal! After several attempts and cleanings, I have it sealed well enough that it now only leaks just a little amount of gas when the tank is very full and swishing about. Will re-seat it another day when I have time and energy to do so 🙂 If it continues to leak ever so slightly, I may need to replace the fuel tank =/


Recent Comments