Posts tagged Virtualization
New CVGM.net Server Upgrade Almost Ready!
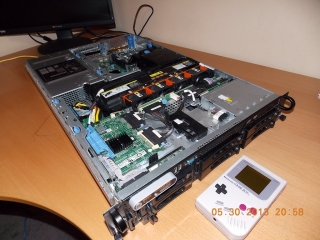
0This is the new Dell PowerEdge 2950 server that will be used on the CVGM.net website. It’s packing a nice dual quad-core 3.16Ghz CPU, 16gb of ram, and VMWare to make management and repairs easier and better. The current server only has 2GB of ram, and a very ancient quad-core 2.1Ghz cpu (one of the first Xeon quad core CPU’s released). We are still adding some bits to it, saving up our spare change and buying them as we can.
In the next few weeks, this bad boy will be shipped off to the datacenter and installed in it’s rack, so the site can receive a much-needed upgrade.
If you want to check out CVGM and listen to some great oldskool computer game music, check out http://www.cvgm.net Thanks!
Immutable Drives In VirtualBox On Windows
2I have been playing with VirtualBox for the last day or so now, and I am very pleased with the way that it works so far. Feels snappier to me than VMWare did, but maybe thats just me 🙂
One of the more useful features I found in VirtualBox is immutable hard drives. These are drive images that never change, so to speak. Any data that is written is saved to another drive containing only changes, so if you have lots of VM images for many different projects (like I do) you don’t have to install an OS on each of them; Just make a differencing disk and only make it the size of the changed data (such as programs and updates etc.) Brilliant!
It took me a while to figure out how to make an immutable disk on Windows, as the GUI is not very friendly towards this process. You should start by making a new Virtual Machine with the desired OS (I used Windows for the time being) and create a new hard drive image for it. From that VM, proceed to install Windows as you normally would do, activate it and install all your Windows updates and tools you wish shared to your multiple machines. For me, this is mostly just Windows, all the updates, and Altap Salamander.
Once this process was done, I proceeded to delete all temporary files from the system, a bunch of un-necessary Windows files, and ran a defrag on the drive using PerfectDisk to make sure everything was at it’s peak performance.
In order to make the drive immutable, we have to perform several steps to it. Firstly, I compressed the VDI image to make sure the file was as small as possible. While cloning will do this for us as well (described later) I wanted to keep the original image small in case I needed it for something else in the future. VirtualBox is great in that you can control it via the command line. Open a Command Prompt and change the folder that you installed VirtualBox and run the VBoxManage command with the modifyhd command, followed by the VDI file and the compact command:
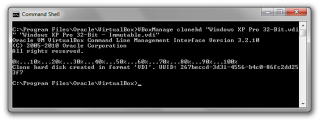
This may take a few minutes to complete, but if the file has lots of empty space in it, that will all disappear after the process is complete. Next, we will make a clone of the disk. Again, I chose to do it this way so I could keep the original for something else in the future. Cloning a drive is very simple to do, using the clonehd command and the filename of the source VDI, and a filename of a target VDI. Cloning is an important step, as VirtualBox won’t allow you to use the same VDI file copied to multiple locations, the cloning process changes the internal drive GUID so that the clone can be added as a seperate drive. In VMWare in the past, i’d have huge VMDK files that I would just copy to a new VM and launch from there, which also resulted in much larger files being used than what was actually necessary. I cloned the drive using the following command:
VBoxManage clonehd "Windows XP Pro 32-Bit.vdi" "Windows XP Pro 32-Bit - Immutable.vdi"
Which will produce a new VDI file that we will use with our future VM’s:
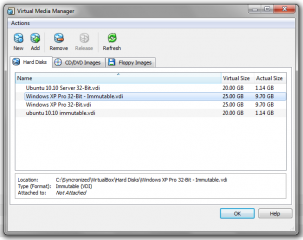
If you go back to the Media Manager in VirtualBox, click on Add and add the newly created VDI file to the list of volumes. Everything should match except for the name. The next step is to mark this as an immutable drive, so VirtualBox recognizes it as such. This is done with the modifyhd tag as follows:
VBoxManage modifyhd "Windows XP Pro 32-Bit - Immutable.vdi" --type immutable
And if you refresh your Media Manager folder, you will see that the drive type is now set to immutable:
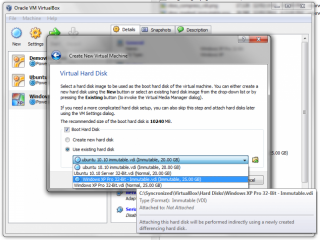
So, now that we have an immutable drive we should probably try and use it 🙂 To do this, simply go back to the VM management and create a new Virtual Machine for Windows as you did before. Now when you get to the part where it asks about the Hard Drive, choose an existing drive and select the Immutable image, You will notice that it has a blue spot next to it, signifying that it’s immutable:
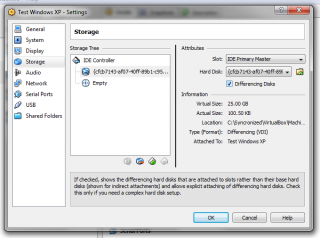
After the VM is created, click Settings and go to Storage, select the Immutable drive and place a checkmark in the box for differencing. This will cause a new hard disk name to appear. Click OK to accept the changes, then launch the VM. It will boot to the same way as it did before, except its not using the old image. Make sure it boots OK then go ahead and shut down the VM so we can make some changes.
Some Notes About Differencing
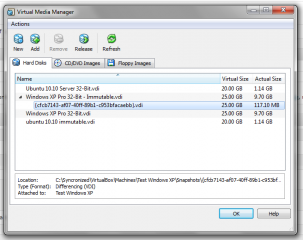
Typically, drives that use differencing disks will “forget” the changes made to them once the VM is restarted. This is the case here by default, once you boot with a differencing disk, any changes made will be lost when it shuts down. This protects the original disk, and prevents anything from changing in it. Its always easy to see which VM’s use immutable drives, if you go to the Media Manager there will be an expandable arrow next to the main drive, which contains all the differencing disks from the various VM’s that use that specific immutable drive.
Differencing disks can be changed to allow them to retain their changes after the VM shuts down. In the console, simply run the following command (exchanging the GUID for the one found in your media manager) :
VBoxManage modifyhd cfcb7143-af07-40ff-89b1-c953bfacaebb --autoreset off
The filename should match the GUID and is located in the Virtual Machines folder/{Machine Name}/Snapshots folder. Mine is {cfcb7143-af07-40ff-89b1-c953bfacaebb}.vdi respectively.
After that, any changes written to the disk will remain permanent! I hope this helps someone out there with a similar situation, and that this helps then understand it a little better 🙂

Recent Comments